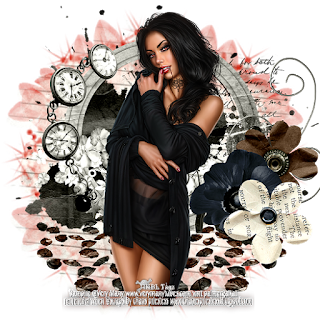
TUTORIAL - MISTED SHAPES

This is my own creation, Hope you enjoy it!
Materials:
malackatube g011
you can find her here: malacka's blogspot
SBK buton eye accent drops (my own feel free to use and share)
shape 55
gotten from a Yahoo Challenge group here: Winni PSP Challenges
misted scenerydragon blu
Narah Mask 0980
1250181435 nikita masque
You can find all of the materials here; MATERIALS
Filters:
Penta Dot & Cross
Mura Meister - Perspective Tiling
Toadies - what are you?
Flaming Pear - Flexify 2
AP silverline - dotty grid
Eye candy 5 Impact - Perspective shadow
Graphics Plus - Cross Shadow
Set materials palette
foreground: fbebbb
background: b36bb9
install filters and the two masks to their respective folders in PSP
The Tutorial:
1. open a new transparent image 800 x500
2. flood fill with background color
3. layer - new raster layer
4. flood fill with foreground color
5. Layer - New Mask Layer
find your 1250181435 nikita masque

Merge - merge group
6. Effects - Penta - dot n Cross

change mode of this layer to soft light
merge all flatten
layer duplicate
7. Effects - Mura meister - perspective tiling

8. From the top layer:
Open shape 55
edit copy
back on your working image
paste as new layer
select all
select float
select defloat
flood fill with your dark color
deselect
9. Effects - image effects - seamless tiling

10. Effects - Toadies - what are you (default)

11. Effects - Flaming Pear - Flexify 2

12. Effects - drop shadow x2

13. Effects - Edge Effects - Enhance more
14. Effects - user defined 3
15. Layers duplicate
16. Effects - seamless Tiling (same as before)
17, Effects - AP silverlines

18. Layers - duplicate
19. Effects - Mura Meister - perspective tiling (same as before)
20. Image flip Image mirror
drag down to the bottom and place this layer 2 up from the bottom layer
layer merge down
make the mode of this layer multiply
21. On your top layer grab your magic wand tolerance and feather 0
and pick the areas show. you may have to click multiple times to get them correct.

22. Open your mist...Edit copy
back to the working image
layer new raster layer
edit - paste into selection.
drop shadow used before.
Layers - arrange move down
merge with the layer above
select none
23. Adjust - sharpen
25. Open SBK button eye accents
grab the color o your choice or you can use the purple i did and change color o your liking.
on your working image paste as new layer
resize 50%
resize resize 70%
Place the button on the far left as shown in the tag
layer duplicate image mirror
layer duplicate nd move to the top left above the mist
layer duplicate image mirror
merge down 3 times
apply the same drop shadow
26. Layers - new raster layer
27. New mask layer narah 0980
and merge group
28. Layer - duplicate
image mirror
image flip
mergethe two layers and make the mode soft light
29. Open your tube of choice or malacka
edit copy and past on your image.
Resize to your taste
30. Effects - Eyecandy5 impact - perspective shadow

31. adjust sharpen
32. Merge all layers - flatten
edit - copy
33. add borders:
2 px dark
2 px light
2 px dark
30 px white
34. grab your magic wand and highlight the large white border
35. Layer new raster layer
36. edit - paste into selection
37. adjust blur radial blur

38, Effects - graphics plus - cross shadow (default)
39. selections - invert
apply the drop shadow again
40. selections - select none
41. apply the same borders:
2 px dark
2 px light
2 px dark
42. sign your name and resize to taste
AND YOU ARE DONE.....


Comments
Post a Comment