Posts

Showing posts from 2016

NEW TUTORIAL - AUTUMN ROSE

Image
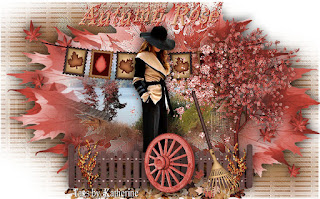
AUTUMN ROSE I woirk in Jasc Psp9 but you can use any version! Thank you to the tubers or owners of the PSP supplies in this tut. Materials:  HERE Scrapkit Clarez- Giving Thanks (in zip) (you can find it her kits and more here:  http://clarezcreationz.blogspot.com/2016/11/giving-time.html?zx=48b60fbfbe85ad93) 0Mask046-LT-vi SoniaTubes 5508 Katjoes-bg-283 Image 6 Filters: Unplugged Tools Tramages Simple THE TUTORIAL 1.  Open an new transparent image 1000x624 2. Selections - Select All 3.  Open paper 5 in the kit.  Edit - copy Edit- paste into selection 4.  Seletions - Select None 5.  Adjust - Blur - Gausian Blur 30 6.  Plugin - Unplugged Tools - Vertical Tile 7.  Plugins - Tramages - Wire Mesh 8.  Effects - Edges - Enhance 9.  Plugins - Simple - Blintz (default) (you can leave as it is or you can add the mask) 10.  Layer- New Mask Layer- )mask046 11.  Layers - Merge Group 12.  Resize 110% x

NEW TUTORIAL - LADY IN RED

Image
LADY IN RED I use Jasc PSP 9 but you can do these tutorials in any version. Materials: HERE Ratoncita -15 (mask) OBG_1407 (tube) Ochi Blu Graphica can be found here: http://www.occhiblugrafica.altervista.org/  Katjoes-bg-251 (mist) Katjoes-Eskamola can be found here: http://www.esmakole.nl/justkatjoes.htm Color Palette: fore dbb480 back 870300 1Filters: Simple Toadies Flaming Pear Itallian Editors THE TUTORIAL 1.  Open a new transparent image 1000 x 624 2.  Form  a gradient (Radial 45/5/invert) 2.  Flood fill your image 3.  Adjust - Blur - Gausian 30 - effects  4.  Effects - Simple - Blintz 5.  Effects - Simple - Diamonds 6.  Layer - Duplicate 7.  Effects - Flaming Pear - Flexify 2 8.  Add a drop shadow of choosing (0,0,80,40) (optional) 9.  With the freehand selection tool, draw around the opening of the ball 10.  Layers - New Raster Layer 11.  Fill the selection with the gradient

NEW TAGS - Septemeber through October

Image

NEW TUTORIAL: AUTUMN BREEZES

Image
Color Pallette: Foreground:  f8e6d1 Background:  ab2d2e Materials:  SUPPLIES -Mask Damier -Narah Mask 0838 -A poser of your choosing (I used a verymany tube which requires a license) -A mist of your choosing (I used  Athe-Py20) a decorative element of  your choosing.   Filters: Ap Lines (silverlining) Toadies Tramages Itallian Editors You can either put the masks in the masks folder of your PSP or open them and minimize in PSP. You can choose colors in your color palette that match your tubes or use mne. Let's Make a Tag: 1.  Open a new transparent canvas 1000 x 624 2.  flood fill with your background color 3.  Layer - New raster layer and paint with your foreground color. 4.  Load/apply Mask damier 5.  layer merge group 6.  Effecet -edge effects - enhance - layer Duplicate 7.  on the top layer - With your magic wand tool click in the light colored middle boxes 8.  effects - AP (line) - Silver

TUTORIAL - WITCHY WOMAN

Image
SUPPLIES NEEDED: A poser tube of you choice (i used witch woman from PSP Project which is now defunct and is copyrighted and so not included in this zip) Mist- Paysage automme jewel 005 OBG Ornament 12 Font - Kingthing pique n meex Smart-Mask-12 SUPPLIES HERE:  WW Supplies FILTERS NEEDED: Simple - Blintz Ap (Silverlines) - line optional vertical Mura Meister - pole transform Mura Meister -  perspective tiling Itallian Editors - picture in a picture Set Color Palette: Foreground:  cf856c background:  ebae1p THE TUTORIAL; 1.  Open New Transparent Image 1024x600 2.  Flood fill foreground (dark) 3.  Flood fill background (light) 4.  Layer - New mask layer - mask from disk 5.  Edge effects - enhance more x 2 Merge group add a drop shadow  put this layer in soft light mode 6.  activate bottom layer and duplicate 7.  selections - select all open your mist (on mine I mirrored before copy) edit - cop edit

TUTORIAL - YOU ARE MY SUNSHINE

Image
YOU ARE MY SUNSHINE MATERIALS NEEDED FOR THIS TUTORIAL: MIST TUBE LADY TUBE SEAGULL FONT - 2 PEAS MR GIGGLES WSL MASK 24 WSL MASK 217 CAN BE FOUND HERE: MATERIALS PLUGINS NEEDED FOR THIS TUTORIAL: SIMPLE - DIAMONDS SIMPLE - ZOOM OUT AND FLIP AP (SILVERLINES) - DOTTY GRID AP (SILVERLINES) - HORIZONTAL GAPS TOADIES - WHAT ARE YOU? ITALLIAN EDITORS - PICURE IN A PICTURE SET COLOR PALETTE TO; FOREGROUND:  fbd3a0 BACKGROUND: 979315 NONE OF THE SUPPLIES USED IN THIS TUTORIAL ARE MY OWN.  MASKS, TUBES, FONTS WERE ALL GATHERED FROM THE VARIOUS SHARE GROUPS I AM IN.  IF THEY ARE YOURS, THANK YOU FOR YOUR SHARES!!!!! THE TUTORIAL: 1.  Open a new transparent image 1024 x 600 2.  Fill layer with background color 3.  Layer-new raster layer 4.  Fill layer with foreground color 5.  Layer - load save mask from disk 6.  Layer - merge Group 7. Duplicate layer (close top for now) 8.  Activate the bottom layer 9.  Effects -