TUTORIAL - YOU ARE MY SUNSHINE

YOU ARE MY SUNSHINE
MATERIALS NEEDED FOR THIS TUTORIAL:
MIST
TUBE LADY
TUBE SEAGULL
FONT - 2 PEAS MR GIGGLES
WSL MASK 24
WSL MASK 217
CAN BE FOUND HERE:MATERIALS
PLUGINS NEEDED FOR THIS TUTORIAL:
SIMPLE - DIAMONDS
SIMPLE - ZOOM OUT AND FLIP
AP (SILVERLINES) - DOTTY GRID
AP (SILVERLINES) - HORIZONTAL GAPS
TOADIES - WHAT ARE YOU?
ITALLIAN EDITORS - PICURE IN A PICTURE
SET COLOR PALETTE TO;
FOREGROUND: fbd3a0
BACKGROUND: 979315
NONE OF THE SUPPLIES USED IN THIS TUTORIAL ARE MY OWN. MASKS, TUBES, FONTS WERE ALL GATHERED FROM THE VARIOUS SHARE GROUPS I AM IN. IF THEY ARE YOURS, THANK YOU FOR YOUR SHARES!!!!!
THE TUTORIAL:
1. Open a new transparent image 1024 x 600
2. Fill layer with background color
3. Layer-new raster layer
4. Fill layer with foreground color
5. Layer - load save mask from disk

6. Layer - merge Group
7. Duplicate layer (close top for now)
8. Activate the bottom layer
9. Effects - Seamless Tiling

10. Effects - Simple - Diamonds
11. Effects - Simple Zoom Out and Flip
12. Effects - AP (lines) - Dotty Grid

13. Layer - New Raster layer
prepare a gradient

14. Pour the gradient
15. Effects - Geometric effects - perspective horizontal

16. Selections - Select All
Selections - select Float
Open your mist and edit-copy
Edit- paste into Selection
17. Layer - Duplicate
18. Layer - mirror
distortion - wind right 100
distortion wind left 100
19. Effects - AP(lines) - Horizontal gaps

20. Activate the layer above and open the top layer
21. Layers - New raster layer
22. Make the following selcetion
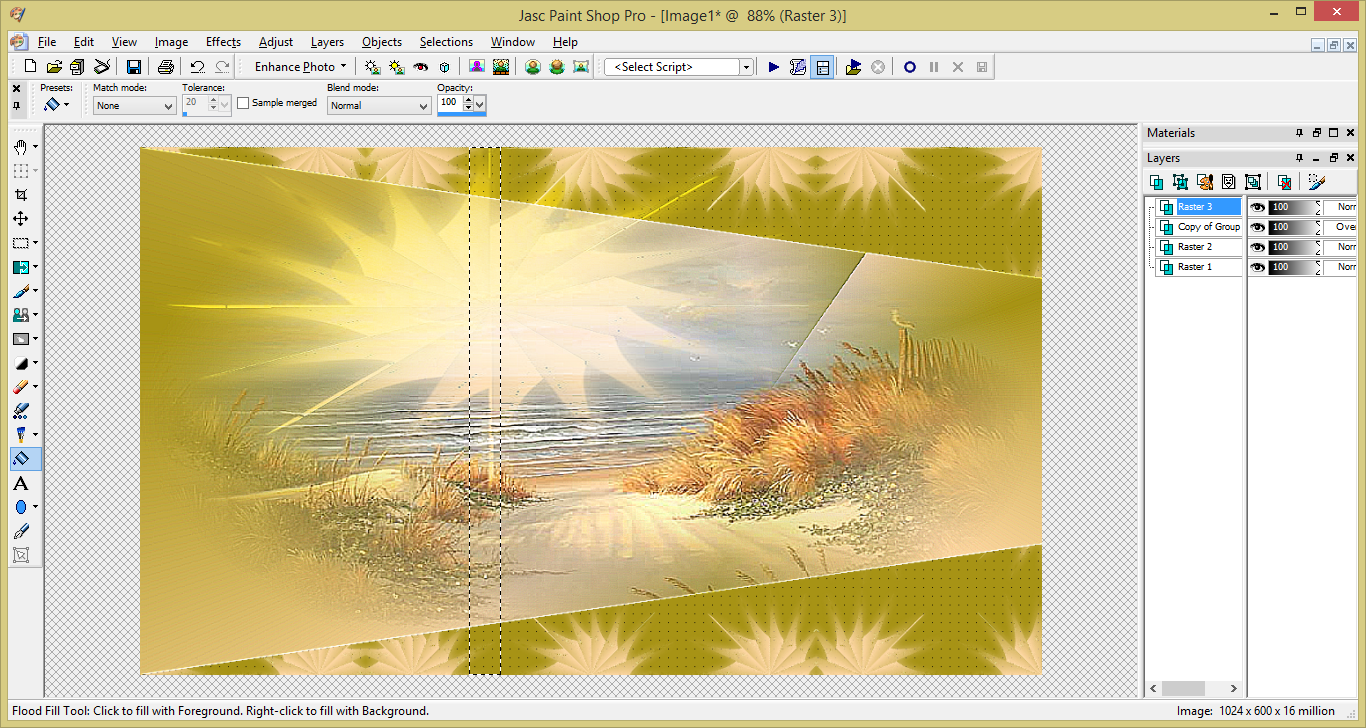
23. Pour in your dark color or background
24. Effects - Geometric effects - Circle

25. Image - Rotate Left 90
26. Effects - Toadies - What Are You?

27. Slide this layer over the sand on the right
28. Slide the top layer sun left over clouds
29. Layers - new raster layer
30. Flood fill with white
31. Layer - new mask layer from disk

32. Merge Group
33. Resize lyaer 80%
34. Slide over the sun
35. Layers merge all flatten
36. Add Borders:
1 px dark
1 px light
1 px dark
36. Edit Copy
37. Add Border 40px white
38. Click your magic wand in this border
39. Pour previous gradient into the border
40. effects - Itallian editors - Picture in a picture

41. Effects - Drop Shadow

42. Effects - edge effects - enhance more
43. Selections - select none
44. Add Borders:
1 px dark
1 px light
1 px dark
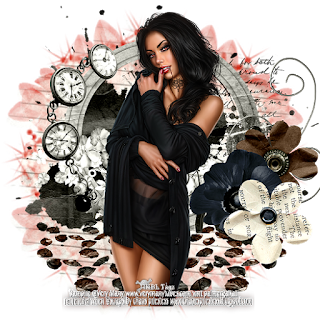
44. Open lady tube
edit - copy
edit paste as new layer on working image.
45. Image - mirror and slide to the right
you can add a dro shadow to taste if you wish at this point
46. Open seagull tube
edit - copy
edit past as a new layer on working image
47. Slide up to the middle of the sun
48. In your color palette set fore and back to white
49. Using your text tool
Font 2 peas mr giggles or your choice type
"You Are My
Sunshine"
Adjust - Sharpen More
50. Effects - Mura Seamless - Emboss at Alpha

51. layer Duplicae
52. On the layer below
effects - distortion effects - Wind from the left 100
53. Layers - merge All Flatten
sign your name
resize to your liking
And you are finished....Yay you.
feel free to leave a comment or send me your samples.


Comments
Post a Comment