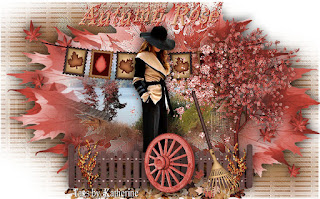
NEW TUTORIAL - AUTUMN ROSE
AUTUMN ROSE
I woirk in Jasc Psp9 but you can use any version!
Thank you to the tubers or owners of the PSP supplies in this tut.
Materials: HERE
Scrapkit Clarez- Giving Thanks (in zip)
(you can find it her kits and more here: http://clarezcreationz.blogspot.com/2016/11/giving-time.html?zx=48b60fbfbe85ad93)
0Mask046-LT-vi
SoniaTubes 5508
Katjoes-bg-283
Image 6
Filters:
Unplugged Tools
Tramages
Simple
THE TUTORIAL
1. Open an new transparent image 1000x624
2. Selections - Select All
3. Open paper 5 in the kit. Edit - copy Edit- paste into selection
4. Seletions - Select None
5. Adjust - Blur - Gausian Blur 30
6. Plugin - Unplugged Tools - Vertical Tile
7. Plugins - Tramages - Wire Mesh
8. Effects - Edges - Enhance
9. Plugins - Simple - Blintz (default)
(you can leave as it is or you can add the mask)
10. Layer- New Mask Layer- )mask046
11. Layers - Merge Group
12. Resize 110% x2
13. Layers - New Raster Layer
14. Selections - Select All
15. Open GT25 (the wreath)
16. Edit - Copy, Edit - Paste into selection
17. Selections - Select none
18. 3D effects - Drop Shadow
19. Edit- Paste as New Layer (should be in memory)
20. Resize 80%
21. Effects - edges - enhance
22. Open your mist
23. Edit copy, Edit paste as new layer and move over the whole of the wreath
NOW WE DECORATE. You can decorate as I did or as you wish.
24. Open GT35 (the tree)
25. Edit copy edit paste as new layer.
26. Resize 80% x2 and slide to the tight
27. Open GT 19 (leaves)
28. Edit copy edit paste as new layer
27. Slide left of the wreath. Duplicate mirror flip(make sure this part of the layer is under the tree)
28. Merge down
28. Open GT 34 (the brown fence)
29. Edit copy edit paste as new layer
30. Slide in front of the tree. Duplicate and mirror and slide together
31. Merge down
32. Open Image 6
33. edit copy edit paste as new layer
34. Open GT 43 (the rake and leaves)
35. Edit copy edit paste as new layer
36. Resize 60% and slide in front of the tree and fence
37. Open GT 38 (the wheel)
35 Edit copy edit paste as new layer
39. Resize 60% x2 and slide to the middle of the fence
40. Open GT 47 (splat)
41. Edit copy edit paste as new layer
42. slide over the left side of the tree
43. Open GT 41 (banner)
44. Edit copy edit paste
45. Resize 60% and slide over the top of the wreath and put this layer under the tree layer
46. Open your lady tube (Sonia 5508)
47. Edit copy edit paste as new layer
48. resize 80% and put this layer behind the fence and place over the wheel
49. Adjust - Sharpness - Sharpen x 2
50. 3D effects - Drop Shadpw as before
51. You can add your name or a saying, or a watermark at this time
52. Layers - Merge visable
53. Image resize all layers 80%
AND YOU SURVIVED.
I hope you enjoyed this tutorial. Feel free to smail me you creations so I can show them off to palmergalkat@yahoo.com
Happy Thanksgiving to All.


Comments
Post a Comment